If ever a car defined all that is right about BMW's M
Division, it's the M3. The E46 M3 was the third generation of this compact,
high performance model and it struck M gold with its balance of power,
performance and usability.
Introduced in October 2000, the E46 developed the M3 theme
with an improved and updated version of the 3.2-litre straight-six engine. It
developed 343hp, giving it one of the highest specific outputs of any naturally
aspirated engines in the world at its launch. North American-bound M3s were
saddled with a detuned engine producing 333hp, but we'll concentrate on
Euro-spec models in this guide.
A six-speed manual gearbox was the only option for the E46
M3, but BMW offered it with SMG (sequential manual gearbox) to do away with the
clutch pedal, but not the clutch. BMW also introduced a Convertible version of
the M3 in February 2001.
The ultimate M3 arrived in May 2003 with the CSL (Coupe
Sport Leichtbau). It shed 110kg over the standard M3 Coupe by ditching luxuries
such as electrically adjusted leather seats, air conditioning, satellite
navigation and the stereo system. As its suggests, the CSL was a more hardcore
machine with unique 19-inch Y-spoke alloy wheels fitted with near slick
Michelin Pilot Sport Cup tires that made the car a handful in the wet. Because
of this, BMW asked CSL buyers to sign a disclaimer saying they understood the
nature of the tires.
With an extra 17hp, plus a carbon fiber roof, front spoiler
and rear diffuser, the CSL notched up 0-62mph in a claimed 4.5 seconds compared
to the standard M3 Coupe's 5.1 seconds. The reality is the CSL managed this
sprint in 4.5 seconds in contemporary magazine road tests and the standard car
was good for 0-62mph in 4.8 seconds in the hands of an aggressive road tester.
Both the manual and SMG transmissions delivered the same acceleration figures,
while top speed was pegged to 155mph, though again reality showed 160mph was
more usual.
A last hurrah M3 CS in 2005 took the wheels, brakes,
steering wheel, quicker steering rack and uprated traction control of the CSL
and married them to an otherwise standard M3 Coupe. The big difference with the
CS was it could be bought with the standard six-speed manual gearbox rather
than the SMG 'box that was the only choice in the CSL.
Production of the E46 M3 came to a halt in August 2006 when
the last of the Convertibles rolled down the Regensburg line.
Powertrain

The 3,246cc S54 six-cylinder engine used in the E46 M3 has
an iron block with 87.0x91.0mm bore and stroke. Compared the previous E36 M3,
the E46 model gained new camshafts and an increased compression ratio, rising
to 11.5:1 from 11.3:1. There was also a new Siemens-developed engine management
control system, fly-by-wire throttle and two-mode M Dynamic Driving Control
that offered Normal and Sport modes to alter throttle response.
BMW also introduced new finger-type rocker arms to reduce
friction in the engine, as well as lowering reciprocating mass in an engine
that could rev to 8,000rpm. A one-piece aluminum cylinder head contained the 24
valves, while a new scavenging oil pump kept them lubricated during hard
cornering.
The result of all this work was 343hp in a normally aspirated engine, which was the most powerful engine per litre BMW had then produced other than the McLaren F1's 6.1-litre V12 motor. Coupled to this is a six-speed Getrag manual gearbox that could be bought in either standard form with a clutch pedal or SMG (sequential manual gearbox) that did away with the clutch pedal in favor of paddle shifters and a gear lever that could be nudged forwards and back to change gear. In the SMG II 'box, the clutch is actuated by BMW's electrohydraulic Drivelogic system that offers 11 different modes and a Launch Control.
The result of all this work was 343hp in a normally aspirated engine, which was the most powerful engine per litre BMW had then produced other than the McLaren F1's 6.1-litre V12 motor. Coupled to this is a six-speed Getrag manual gearbox that could be bought in either standard form with a clutch pedal or SMG (sequential manual gearbox) that did away with the clutch pedal in favor of paddle shifters and a gear lever that could be nudged forwards and back to change gear. In the SMG II 'box, the clutch is actuated by BMW's electrohydraulic Drivelogic system that offers 11 different modes and a Launch Control.
Both transmissions have identical ratios and the same
internal components, and both send power to the back wheels through an M
Variable Differential Lock limited-slip differential. To further help the M3
control its power, BMW fitted Dynamic Stability Control as standard.
The M3 CSL only came with the SMG gearbox, which is the same
as the standard M3's. However, the DSC was modified to offer an M Track Mode
that allowed the rear of the car to oversteer more before intervening. To
increase the CSL's power by 17hp to 360hp, BMW added a carbon fiber air box
that lets in more air and gives a louder intake noise. The VANOS variable valve
timing was altered and a lightweight exhaust manifold with thinner, straighter
tubing was also added.
Most CSLs have led a pampered life in the hands of dedicated
enthusiasts as it's not as easy a car to live with as a standard M3. However,
all of the same checks for the M3 Coupe apply to the CSL, so first port of call
should be the service record to make sure the original running-in service was
carried out at 1,200 miles, This included an oil change that has proved
essential to the M3's long-term health.
The SMG's hydraulic fluid pump can fail, leading to the gearbox dropping into neutral. Replacing the pump is costly, but this can also be misdiagnosed when the relay is failing and a new relay is easy and cheap to replace.
The SMG's hydraulic fluid pump can fail, leading to the gearbox dropping into neutral. Replacing the pump is costly, but this can also be misdiagnosed when the relay is failing and a new relay is easy and cheap to replace.
Clutches wear more quickly in SMG-equipped M3s, particularly
those that spend more time in town. Judder from the clutch as drive is taken up
in the lower gears is a clear sign it will need replacing. However, BMW also
offers a software update that should have been added to any SMG M3 to reduce
clutch judder.
As for the engine itself, it's a tough unit. Some early cars
suffered crank bearing failures, but all of these affected cars should have
been repaired under warranty or had the engine replaced by BMW. The fault
seemed to rear its head at around 30,000 miles, so any very low mileage early
M3 should have its history file carefully inspected.
The double VANOS variable valve timing is more robust on the
E46 M3 than it was on the E36 version. However, the VANOS bolts can loosen at
around 70,000 miles. If they break, it can ruin the engine, but stronger
replacement bolts are available from BMW.
A noisy rear differential is nothing to worry about if it
makes a little grumble when turning tightly at low speeds. A change with the
correct Castrol oil will help, but this is a common characteristic of the M3.
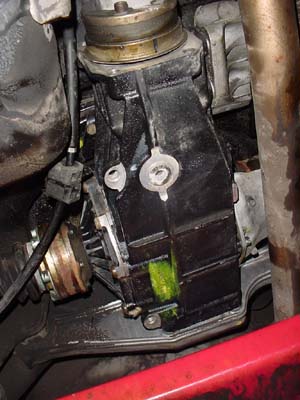
Alternators and coil packs have been known to fail, but both
are straightforward to fix and the competent home mechanic can tackle either
problem to keep costs moderate.
Rolling Chassis
The M3 uses a steel monocoque shell with MacPherson strut front suspension and a multi-link set up at the rear. For the M3, BMW widened the front and rear tracks compared to the standard 3 Series Coupe and fitted unique 'bat wing' forged aluminum lower control arms with bearings and bushes developed solely for the M3.
The M3 uses a steel monocoque shell with MacPherson strut front suspension and a multi-link set up at the rear. For the M3, BMW widened the front and rear tracks compared to the standard 3 Series Coupe and fitted unique 'bat wing' forged aluminum lower control arms with bearings and bushes developed solely for the M3.
For the M3 Convertible, a stronger rear sub frame was added
to carry the larger half-shafts and uprights to cope with the extra power. BMW
also used thicker anti-roll bars, with a 26mm item at the front and 21.5mm at
the rear. In February 2002, the Coupe and Convertible gained an M Racing strut
brace for the front suspension.
A set of 18-inch alloy wheels were standard for the M3, with
the option of 19-inch alloys. Michelin Pilot Sport tires were original fitment
in 225/45 ZR18 front and 255/40 ZR18 rear, with the 19-inch wheels using 225/40
ZR19 and 255/35 ZR19 tires front and rear respectively. The CSL has unique
19-inch alloy wheels with Michelin Pilot Sport Cup tires in 235/35 ZR19 front
and 265/30 ZR19 rear sizes.
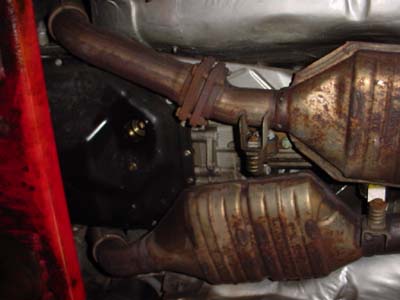
Behind the wheels reside 325mm ventilated discs front and
rear with ABS as standard. The power assisted rack and pinion steering of the
standard M3 needs 3.2 turns from lock to lock, while the CSL quickened this
with a 14.5:1 ratio rack for 3.0 turns between the stops.
The CSL also benefits from firmer suspension with front
springs that are shorter by one coil and different rate shock absorbers.
Thicker front and rear anti-roll bars, 30.8mm and 22.5mm respectively, are
supplemented by aluminum rear suspension links and firmer bushes all round.
Larger 345mm front brake discs are used for the CSL.
Upgrading the brakes for track use is worthwhile and Pagid
Yellow compound pads are a good first step. AP Racing's 335mm front discs with
six-pot calipers are the next logical step for greater stopping power.
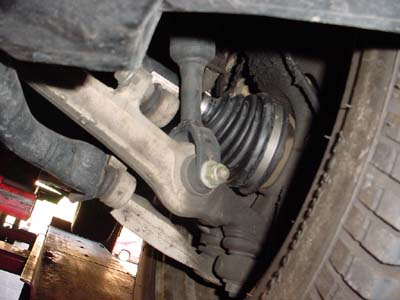
As with all E46 3 Series, the M3's front ball joints wear
and spoil the feel of the car, but they are a straightforward repair. The front
wishbone bushes and rear trailing arm bushes are also likely to need replacing
on any car with 60,000 miles or more on the clock. Rear coil springs and dampers
will most likely need replacing by 80,000 miles.
Aftermarket suspension kits are widely available for the M3,
but cheap ones can ruin the ride and handling balance. Eibach or H&R
springs are worthwhile, while AC Schnitzer kit is better still but expensive.
Last point to look for is a cracked boot floor. BMW will
replace it for free on cars less than 10 years old, but it will be very
expensive to fix on cars where no goodwill is offered.
Body
The M3 is subtly different to the standard 3 Series Coupe with flared wheel arches to cover the wider front and rear tracks, chromed side vents, an aluminum bonnet with power bulge and wider front 'kidney' grilles. There's also a new front bumper with splitter, rear bumper with diffuser and quad tailpipes, and unique M3 door mirrors.
The M3 is subtly different to the standard 3 Series Coupe with flared wheel arches to cover the wider front and rear tracks, chromed side vents, an aluminum bonnet with power bulge and wider front 'kidney' grilles. There's also a new front bumper with splitter, rear bumper with diffuser and quad tailpipes, and unique M3 door mirrors.
The CSL took its body a stage further with a roof, front
splitter and rear diffuser made of carbon fiber. Its front bumper is a
different shape to incorporate a single air intake on the left-hand side, while
the composite material boot is shaped to include a rear spoiler. With thinner
rear glass, the CSL saved 110kg over the standard M3 Coupe with SMG gearbox. A
small price to pay for this is the CSL's front bumper is more susceptible to
damage from speed bumps and cracks can appear.
In September 2001, BMW upgraded the xenon headlights to
bi-xenon lights. The self-leveling can fail for these lights, though this is
usually down to a simple relay rather than the entire light unit needing
replacing. For April 2003, LED rear lights became standard across the M3 range.
M3s are more resistant to rust than standard 3 Series
models, due largely to the front wheel arches not having a rubber seal on the
arch liner that attracts mud and damp. However, the rear arches have been known
to corrode where they meet the back bumper, so inspect carefully. While doing
this, also look around the rear window edges for any signs of corrosion.
Door locks need a slug of spray grease every six months to
avoid sticking. It's also important for the Convertible's folding roof linkages
to get a regular dab of grease at every service to keep it working smoothly.
The fabric hood is very well made and should work quickly and fit snugly. Any
drop-top roof that doesn't work and fit properly suggests badly repaired
accident damage.
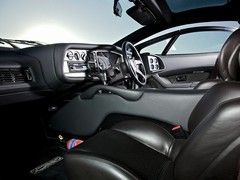
Interior
The M Design seats of the standard M3 are trimmed in Nappa
leather that needs regular cleaning and leather food to keep in tip-top
conditioning. Cracked leather is not uncommon, while the driver's side
right-hand bolster also becomes crushed over time. The steering wheel is unique
to the M3, as are the instrument binnacle's grey-faced dials that include a rev
counter with orange segments that go out as the engine warms through to
indicate the safe rev limit. The speedo reads up to 180mph.

A lot of M3s will have a television and satellite navigation
fitted. The sat-nav will need an up to date CD to give accurate information,
while the television may struggle with today's digital signals. While looking
at the center console, make sure the air conditioning works properly. You
should also press every button to be certain all of the electrics function
properly, including the illuminated M gear knob for the manual gearbox.
The CSL's cabin varies quite a lot from the standard M3s as
it ditches the electrically adjusted front seats in favor of deeper
bucket-style sports seats trimmed in Anthracite Reflex cloth and Amaretta
synthetic suede. These seats do without the side airbags of standard M3 models.
In the back, two individual seats are trimmed in the same cloth as the front
pews, while the steering wheel is finished in Alcantara and has the button for
the M Track mode where you'd normally expect the stereo controls.
Going further, the CSL also has lightweight door trims and a
center console made of lightweight composite material. BMW did away with
satellite navigation, any stereo or CD, air conditioning, sunroof or electric
seat adjustment for the CSL to save weight. Buyers could order air conditioning
as an option.
On all M3s, the interior door handles have been known to
come loose and fall to pieces, though this should have been sorted under
warranty by now. The rear view mirrors light reactive fluid can leak inside the
mirror which will be obvious at a glance. It's expensive to replace from BMW,
so worth checking. Also make sure the door seals fit and sit snugly to keep out
wind and noise.
source: http://www.pistonheads.com/doc.asp?c=52&i=25931by Alisdair Suttie